Best Honkai: Star Rail Dr. Ratio Build, Skills, And Team Comps
Dr. Ratio rivals Herta’s arrogance and Ruan Mei’s eccentricity. As a member of the Intelligensia Guild, he has a low tolerance for ignorance. Unlike the Genius Society, the Guild believes that the pursuit of knowledge should be free to anyone willing to learn and not just a select few. Dr. Ratio is a scholar and teacher at the Guild, known for his odd habit of wearing a plaster mask like the kind you’d see on a Greek statue or in a museum. (It’s apparently to block out the idiots.)
Dr. Ratio is the first member of the Guild to appear as a playable character in Honkai: Star Rail. He’s also the first limited-time 5-star character that HoYoverse has offered to its players. Here’s a quick rundown of Dr. Ratio’s abilities and his best Light Cones, Relics, and team comps.
Dr. Ratio specializes in two things that set him apart from other DPS characters: increased damage against debuffed enemies and follow-up attacks. Some characters deal extra damage against enemies afflicted with specific status effects (looking at you, Kafka) and those famous for their follow-up attacks (Topaz, Blade, Himeko, etc), but these abilities haven’t been combined into one character until now. These traits make Dr. Ratio more of a team player than his personality would suggest.
His Ultimate triggers a follow-up attack whenever his teammates attack the same enemy. Meanwhile, his Talent raises the chance of triggering a follow-up attack when Dr. Ratio uses his Skill. That’s not including his Ascension Passives, which increase Crit Rate, Crit DMG, and damage dealt to debuffed targets even more. Be sure to read the exact triggers below, though.
These are the descriptions of his abilities starting at Level 1.
Dr. Ratio abilities

Basic attack: Mind is Might
Dr. Ratio deals Imaginary DMG equal to 50 percent of his attack to a single enemy.
Skill: Intellectual Midwifery
Dr. Ratio deals Imaginary DMG equal to 75 percent of his attack to a single enemy.
Ultimate: Syllogistic Paradox
Syllogistic Paradox boasts high damage and triggers hard-hitting follow-up attacks. Dr. Ratio deals Imaginary DMG equal to 144 percent of his attack to a single enemy and applies the Wiseman’s Folly effect to the target. This effect triggers his follow-up attack whenever allies attack the same enemy up to two times. It only affects the most recent target of his Ultimate and the triggers reset each time his Ultimate is used.
Talent: Cogito, Ergo Sum
When using his Skill, Dr. Ratio has a 40 percent chance of launching a follow-up attack that deals 135 percent of his ATK as Imaginary DMG. The chance of a follow-up attack increases by 20 percent for each debuff the target has. If you already have two character to apply debuffs, that can rise to 80 percent without Dr. Ratio even applying one himself.
Technique: Mold of Idolatry
Mold of Idolatry creates a special dimension using a decoy that taunts enemies for 10 seconds. Dr. Ratio inflicts 15 percent SPD Reduction on any enemies within this dimension for two turns. Don’t stand within the space or the enemy will attack you.
Prioritize leveling up Dr. Ratio’s abilities in this order: Talent > Ultimate > Skill > Basic Attack.
Ascension Passives
- Ascension 2 Passive–Summation: When Dr. Ratio uses his Skill, for every debuff on the target, his CRIT Rate increases by 2.5 percent and CRIT DMG by 5 percent. This effect can stack up to 6 times.
- Ascension 4 Passive–Generosity: When Skill is used to attack a target, there is a 100 percent base chance to reduce the attacked target enemy’s Effect RES by 10 percent for 2 turns.
- Ascension 6 Passive–Courage: When dealing DMG to a target that has 3 or more debuffs, for each debuff the target has, the DMG dealt by Dr. Ratio to this target increases by 10 percent, up to a maximum increase of 50 percent.
Best Light Cone for Dr. Ratio

Dr. Ratio’s best Light Cone is Baptism of Pure Thought, a five-star Light Cone specifically tailored for his kit. It increases his Crit DMG and further raises it with every debuff, something you’d already want to take advantage of with his Talent. It even increases DMG and ignores the target’s DEF by 20 percent for two turns after Dr. Ratio hits it with his Ultimate. The only downside to this Light Cone is the number of Rail Passes you’d need to use to get it. It’s a limited-time Light Cone that runs alongside Dr. Ratio’s banner.
Any of the other five-star Hunt Light Cones will also do a fine job. Topaz’s Worrisome, Blissful increases Crit Rate and DMG from follow-up attacks, which also works well with Dr. Ratio. Sleep Like The Dead raises Crit DMG by default, but it also raises Crit Rate whenever the user’s Basic ATK and Skill doesn’t result in a CRIT hit. These also depend on gacha, though.
The best free-to-play option is hands-down the Cruising in the Stellar Sea Light Cone from Herta’s Shop. You can earn it by grinding through the Simulated Universe, which you’ll need to do anyway to earn Ornaments. This is something you can start doing, even within the early hours of the game, so there’s no excuse to miss it.
If you must use a four Light Cone (for example, if you happen to already have Cruising in the Stellar Sea equipped on another character), then you can try Only Silence Remains or Return to Darkness. Only Silence Remains is a gacha Light Cone you might already have from pulling on banners. Return to Darkness comes from the Nameless Honor Battle Pass, which you can buy. (Again, I’d recommend Cruising in the Stellar Sea over that because it is free.)
Arrows or Darting Arrow, two three-star Light Cones you will get early in the game, can also work as a stand-in while waiting for better Light Cones. I’d personally choose Arrows because of the Crit Rate boost, even if it only lasts for three turns.
These are the descriptions for each Light Cone mentioned above (at Level 1):
- Baptism of Pure Thought (5-star): Increases the wearer’s CRIT DMG by 20 percent. For every debuff on the enemy target, the wearer’s CRIT DMG dealt against this target increases by 8 percent, stacking up to 3 times. When using Ultimate to attack the enemy target, the wearer receives the Disputation effect, which increases DMG dealt by 36 percent and enables their follow-up attacks to ignore 24 percent of the target’s DEF. This effect lasts for 2 turns.
- Worrisome, Blissful (5-star): Increase the wearer’s CRIT Rate by 18 percent and DMG from follow-up attacks by 30 percent. When allies hit enemy targets under the Tame state, every Tame stack will increase the CRIT DMG received by 12 percent.
- Cruising in the Stellar Sea (5-star): Increases the wearer’s CRIT rate by 8 percent, and increases their CRIT rate against enemies with HP less than or equal to 50 percent by an extra 8 percent. After wearer defeats enemy, increases ATK by 20 percent for 2 turns.
- Sleep Like The Dead (5-star): Increases the wearer’s CRIT DMG by 30 percent. When the wearer’s Basic ATK or Skill does not result in a CRIT Hit, increases their CRIT Rate by 36 percent for 1 turn. This effect can only trigger once every 3 turns.
- Only Silence Remains (4-star): Increases the wearer’s ATK by 16 percent. If there are 2 or fewer enemies on the field, increases wearer’s CRIT Rate by 12 percent.
- Return to Darkness (4-star): Increases the wearer’s CRIT Rate by 12 percent. After a CRIT Hit, there is a 16 percent fixed chance to dispel 1 buff on the target enemy. This effect can only trigger 1 time per attack.
- Arrows (3-star): At the start of the battle, the wearer’s CRIT Rate increases by 12 percent for 3 turns.
- Darting Arrow (3-star): When the wearer defeats an enemy, increases ATK by 24 percent for 3 turns.
Best Relics for Dr. Ratio

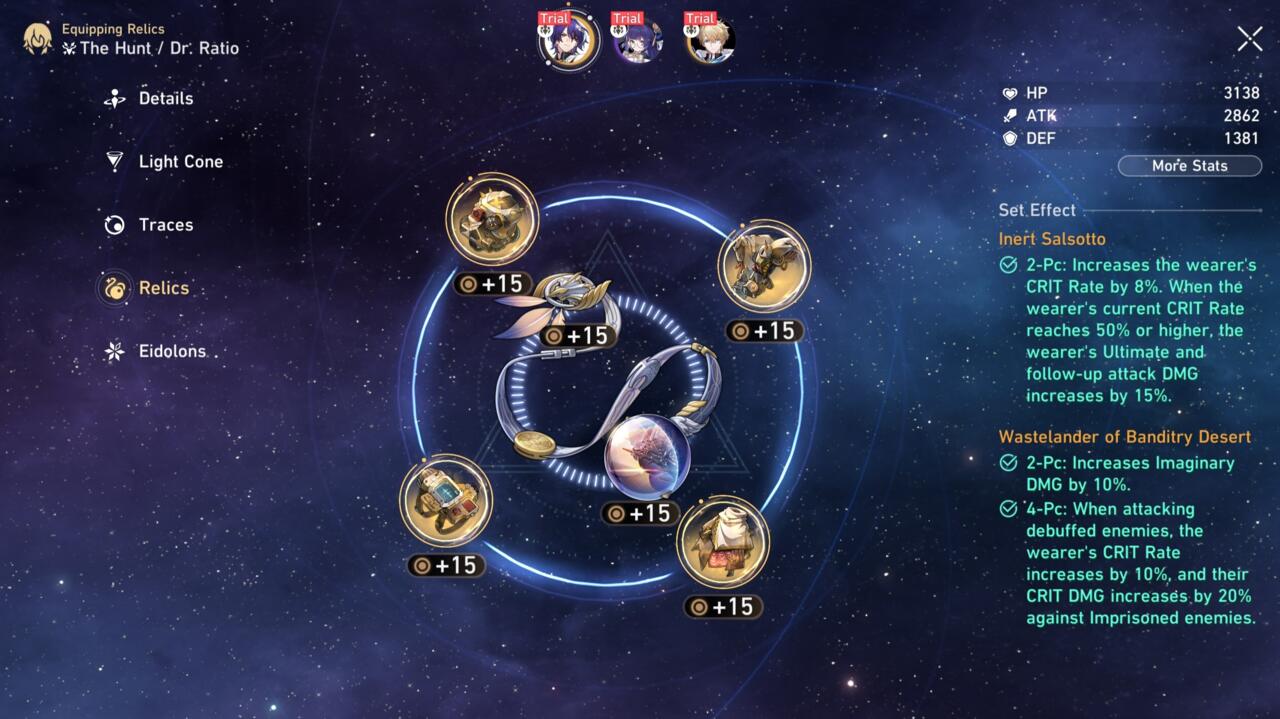
If you can, get a four-piece Wastelander of Banditry Desert set to boost Dr. Ratio’s Imaginary DMG and increase Crit Rate against debuffed enemies. He also gets a Crit DMG bonus against Imprisoned (the Imaginary character debuff) enemies. It’s as if this set was built for him with how well it complements his kit.
You might not get an ideal four-piece set right away, though. In the meantime, you can try wearing a two-piece Wastelander set with a two-piece Ashblazing Grand Duke set. Ashblazing is a newer set that came out with the introduction of Topaz & Numby, but it also works well with Dr. Ratio because of the 20 percent boost to follow-up attack damage. Two-piece Musketeer of Wild Wheat with two-piece Wastelander also does well with its Imaginary DMG and ATK boost. Musketeer is an older set that many players should have because of how early it becomes available.
Here are the descriptions of the set bonuses for review:
Wastelander of Banditry Desert
- Two-piece effect: Increases Imaginary DMG by 10 percent.
-
Four-piece effect: When attacking debuffed enemies, the wearer’s CRIT Rate increases by 10%, and their CRIT DMG increases by 20 percent against Imprisoned enemies.
The Ashblazing Grand Duke
- Two-piece effect: Increases the DMG dealt by follow-up attacks by 20%.
- Four-piece effect: When the wearer uses follow-up attacks, increases the wearer’s ATK by 6% every time the follow-up attack deals DMG. This effect can stack up to 8 time(s) and lasts for 3 turn(s). This effect is removed the next time the wearer uses a follow-up attack.
Musketeer of Wild Wheat
- Two-piece effect: ATK increases by 12 percent.
- Four-piece effect: The wearer’s SPD increases by 6 percent and Basic ATK DMG increases by 10 percent.
As for Ornaments, Inert Salsotto stands out as Dr. Ratio’s best option because it raises Crit Rate and follow-up attack DMG. While raising the wearer’s Crit Rate above 50 percent might be difficult for other characters, Dr. Ratio makes it easier because of the Crit Rate build into his Traces. You’ll get at least 10 percent just from leveling him up. The rest can easily add up through his Light Cone and Relics. If you have yet to farm for Inert Salsotto, it doesn’t hurt to stick with the ATK-boosting Space Sealing Station until you do, though.
- Inert Salsotto: Increases the wearer’s CRIT Rate by 8 percent. When the wearer’s current CRIT Rate reaches 50 percent or higher, the wearer’s Ultimate and follow-up attack DMG increases by 15 percent.
- Space Sealing Station: Increases the wearer’s ATK by 12 percent. When the wearer’s SPD reaches 120 or higher, the wearer’s ATK increases by another 12 percent.
Dr. Ratio Relic stats
As a DPS, Dr. Ratio benefits most from ATK, Crit DMG, and Crit Rate. You’ll generally want to lean toward Crit Rate for his body piece, but if you already reach 70 to 80 percent with his Traces, Light Cone, and substats, then you should go for Crit DMG. For his feet, go for SPD boots so that he can squeeze in as many turns as possible.
Choose an Imaginary DMG sphere and Energy Regeneration Rope for his Ornaments. One raises his overall Imaginary DMG and the other will make it so that you can use his Ultimate as much as possible. That’s important, considering that his Ultimate applies a marker to an enemy that triggers follow-up attacks when teammates hit them.
|
Relic |
Main Stat |
Sub-Stat |
|
Body |
Crit DMG, Crit Rate |
ATK, Crit DMG, Crit Rate, SPD |
|
Feet |
ATK, SPD |
ATK, Crit DMG, Crit Rate, SPD |
|
Sphere |
Imaginary DMG |
ATK, Crit DMG, Crit Rate, SPD |
|
Link Rope |
ATK, Energy Regeneration |
ATK, Crit DMG, Crit Rate, SPD |
Best teams for Dr. Ratio

Dr. Ratio’s best teammates will complement his strengths. As a single-target and follow-up-focused DPS, he’ll need as much help as he could get to raise his damage. He works especially well with 5-stars that specialize in debuffs and follow-up attacks like Topaz, Kafka, and Welt. However, he’s a perfectly capable attacker that could smoothly run with just 4-star and free-to-play characters.
Dr. Ratio, Topaz, Guinaifen, Lynx
- Dr. Ratio can benefit from Topaz’ follow-up buffs and Guinaifen’s ability to spread Burn. Meanwhile, Lynx can heal allies and AoE cleanse to increase survivability.
Dr. Ratio, Serval, Natasha, Kafka
- Serval and Kafka can work together to apply Shock to enemies. Dr. Ratio and Kafka deal extra damage to Shocked enemies, so that’s especially relevant. Natasha works as the team’s healer, but you can replace her with others like Lynx, Huohuo, or Luocha. Serval and Natasha are just free-to-play-friendly choices because of how easy they are to obtain.
Dr. Ratio, Lynx, Tingyun, Welt
- Pela and Welt debuff enemies while Lynx keeps the team alive. Tingyun can increase Dr. Ratio’s damage and charge Ultimates where needed.
Dr. Ratio, Natasha, Fire Trailblazer, Asta
- This free-to-play team balances defense and DoTs in one. Equipping Trend of the Universal Market to any Preservation character with Taunt turns them into a DoT character thanks to its special ability. It applies Burn to any enemy that attacks the wearer and damages them based on their DEF stat. Fire Trailblazer has both things going for them: abilities that scale based on DEF and a Taunt that can trigger the effect. Asta can raise SPD and capably Burn enemies when built correctly.
NoxPlayer is a free Android emulator for playing mobile games on PC and Mac, supporting Android 5, 7, 8, and 9, and compatible with Intel, AMD, and Apple processors. You can run NoxPlayer perfectly on commonly-used operating systems like Windows 7, 8, 10, 11, and iOS.
Visit our site to learn more about NoxPlayer : www.bignox.com